React native 依赖
导航跳转
 yarn add react-navigation  or   npm install react-navigation
 yarn add react-native-reanimated react-native-gesture-handler react-native-screens@^1.0.0-alpha.23
使用react-native-tab-navigator实现底部导航栏
github 官方 react-native-tab-navigator 简书 react-native配置Tab栏 和 配置Tab栏的图标 CSDN React Native(简单精致的底部导航栏)
 npm install react-native-tab-navigator --save
 yarn add react-native-tab-navigator --save
页面路由
github 官方 react-native-router-flux react-native-router-flux物理返回键 CSDN react-native-router-flux tabbar 底部导航 点击事件,页面跳转切换 跳转
yarn add react-native-router-flux
Banner 轮播 Swiper
github 官方 react-native-swiper 简书 React Native 第三方库之 react-native-swiper
yarn add react-native-swiper@nightly
视频
github 官方 react-native-video 掘金 react-native-video CSDN react-native-video
yarn add react-native-video
绘图 Echarts
github 官方 react-native-echarts 简书 react-native-echarts
yarn add react-native-echarts (或 npm install native-echarts --save)
拍照/访问相册
github 官方 react-native-image-picker 简书 react-native-image-picker react-native-image-picke的详细使用图解
yarn add react-native-image-picker(或 npm i react-native-image-picker)
项目中的android->app->src->main->AndroidManifest.xml文件 添加 两行
<uses-permission android:name="android.permission.CAMERA" />
<uses-permission android:name="android.permission.WRITE_EXTERNAL_STORAGE"/> 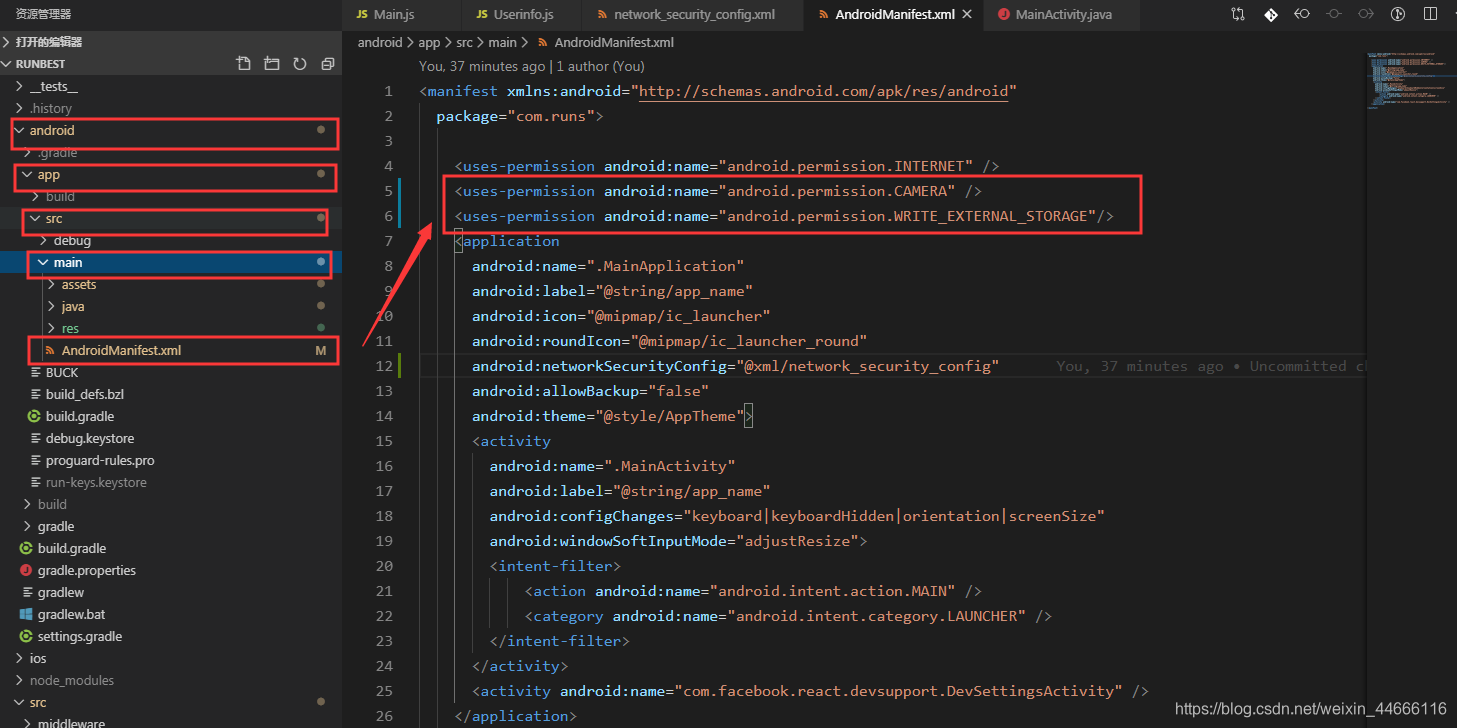
项目中的android> app > src> main > java > com> runs>MainActivity.java 文件 1. 添加以下两行:
import com.imagepicker.permissions.OnImagePickerPermissionsCallback; // <- add this import
import com.facebook.react.modules.core.PermissionListener; // <- add this import
2. 添加如下一行:
private PermissionListener listener; // <- add this attribute 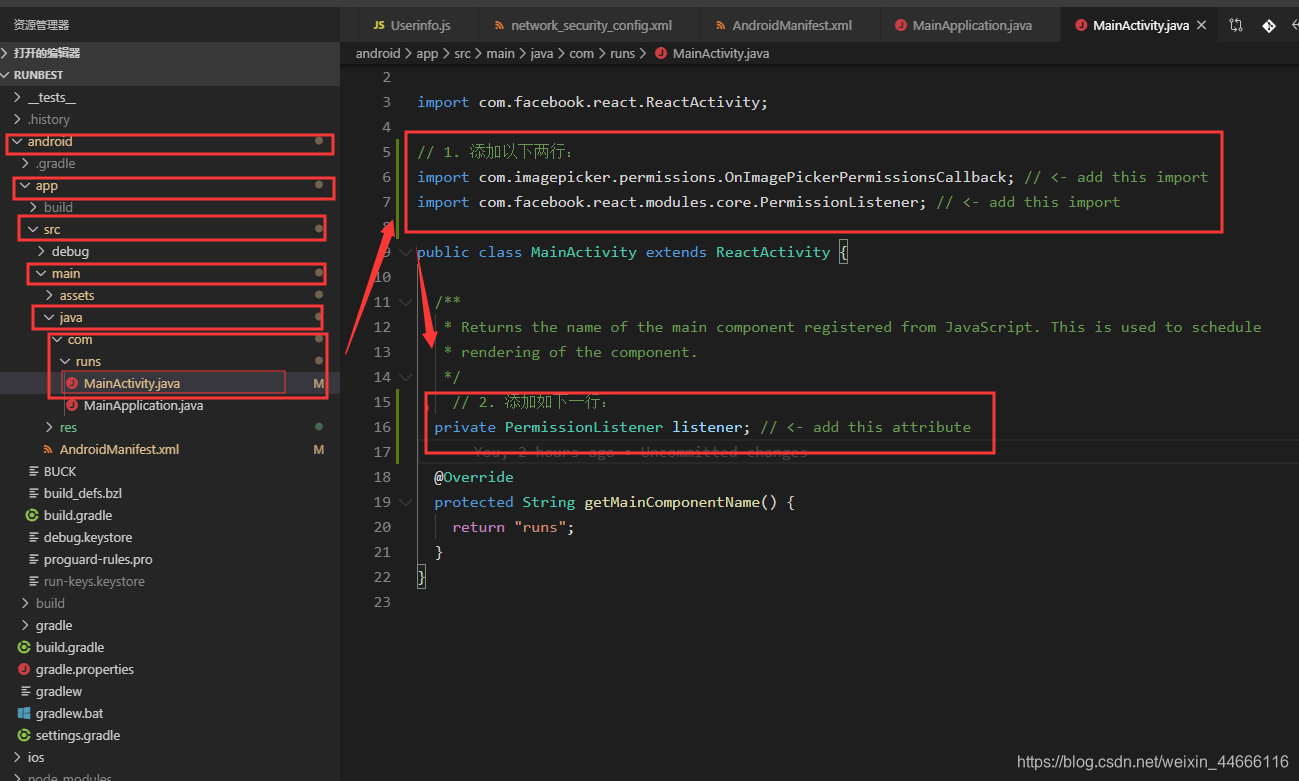
项目案例
	// 第1步:
	import {View, Button, Image} from 'react-native'
	import ImagePicker from 'react-native-image-picker'
	var photoOptions = {
	  //底部弹出框选项
	  title: '请选择',
	  cancelButtonTitle: '取消',
	  takePhotoButtonTitle: '拍照',
	  chooseFromLibraryButtonTitle: '选择相册',
	  quality: 0.75,
	  allowsEditing: true,
	  noData: false,
	  storageOptions: {
	    skipBackup: true,
	    path: 'images'
	  }
	}

	// 第2步:
	constructor(props) {
	super(props);
	    this.state = {
	      imgURL: ''
	    }
	  }

	// 第3步:
	<Image source= style=></Image>
	<Button title="拍照" onPress={this.cameraAction}></Button>

	// 第4步:
	cameraAction = () => {
	ImagePicker.showImagePicker(photoOptions, (response) => {
	  console.log('response' + response);
	  if (response.didCancel) {
	    return
	  }
	  this.setState({
	    imgURL: response.uri
	  });
	})
	}
Modal模态框实现弹窗效果
react native 官方案例 CSDN Modal模态框实现弹窗效果
import {Modal} from 'react-native'

  <Modal
   animationType='fade' // 指定了 modal 的动画类型。类型:slide 从底部滑入滑出|fade 淡入淡出|none 没有动画
   transparent={true} // 背景是否透明,默认为白色,当为true时表示背景为透明。
   visible={this.state.genderVisible} // 是否显示 modal 窗口
   onRequestClose={() => { this._closeGenderVisible(); }} // 回调会在用户按下 Android 设备上的后退按键或是 Apple         V 上的菜单键时触发。请务必注意本属性在 Android 平台上为必填,且会在 modal 处于开启状态时阻止BackHandler事件
   onShow={()=>{console.log('modal窗口显示了');}} // 回调函数会在 modal 显示时调用
 >
              <View style={styles.modalLayer}>
                    <View style={styles.modalContainer}>
                        <Text style={styles.modalTitleStyle}>这是个Modal窗口!</Text>
                        <View style={styles.modalButtonStyle}>
                            <Button
                                title='取消'
                                color="#A4A4A4"
                                onPress={this._closeGenderVisible}
                            ></Button>
                        </View>
                    </View>
                </View>
      </Modal>

   //open Gendershow
setGenderVisible(visible) {
    console.warn('visible------ ',visible)
    this.setState({genderVisible: visible });
}

//close Gendershow
_closeGenderVisible = () => {
    this.setState({genderVisible: false});
}

 modalLayer: {
        backgroundColor: 'rgba(0, 0, 0, 0.45)',
        flex: 1,
        justifyContent: 'center',
        padding: 32
    },
    modalContainer: {
        height: 300,
        backgroundColor: 'white',
        justifyContent: 'center'
    },
    modalTitleStyle: {
        textAlign: 'center',
        fontSize: 26
    },
    modalButtonStyle: {
        paddingLeft: 30,
        paddingRight: 30,
        marginTop: 10
    }
react-native-modalbox
使用
npm install react-native-modalbox@latest --save
action方法 open 弹出modal视图 this.refs.myModal.open() close 关闭modal视图 this.refs.myModal.close() 事件监听方法 onOpened 弹出modal视图时会调用这个方法 onClosed 关闭modal视图时会调用这个方法 onClosingState 滑动关闭modal视图时会调用这个方法 属性 isOpen 是否显示modal,默认是false,,如果为true一开始就显示,有动画,可用open方法打开 startOpen 默认是false,是否组建一开始就显示,如果为true一开始就显示,无动画 isDisabled action失效,即open、close方法失效,滑动不能关闭 backdropPressToClose 点击背景是否关modal视图,当backdrop未false的情况下失效 swipeToClose 是否滑动关闭 swipeThreshold swipeArea 在可旋转区域的像素高度,默认窗口高度 position model视图的位置,top、center、bottom entry 这个属性要注意一下,动画的起始位置top、bottom backdrop 是否有点击消失的背景。当这个为false时,backdropPressToClose失效 backdropOpacity modal视图背景的透明度 backdropColor modal视图背景的颜色 backdropContent modal视图背景的内容(view) animationDuration 动画时间 easing 打开modal视图是的方法函数 backButtonClose 仅安卓,当为true时安卓手机按返回键时modal视图close coverScreen 当true时,modal后面的背景是这个window。比如有navitor时,导航条也会遮住 keyboardTopOffset
react native RadioButton(单选按钮)
git hub 官方 react native RadioButton react native RadioButton(单选按钮)
npm i react-native-flexi-radio-button --save
react-native-check-box (复选框)
Git hub 官方 react-native-check-box CSDN react-native-check-box
npm i react-native-check-box --save


  import CheckBox from 'react-native-check-box'

  this.state ={
    isOneChecked:false,
    isTwoChecked:false,
  }

 <CheckBox
style={styles.checkBox}
// onClick={()=>{
//     this.setState({
//     isOneChecked:!this.state.isOneChecked
//     })
// }}
onClick={()=>this.chooseValue('OneChecked')}
isChecked={this.state.isOneChecked}
leftText={'男'}
leftTextStyle = {styles.text}
checkedImage = {<Image source = {require('../../public/Iamge/Check/chooseChange.png')} style = {styles.image}/>}
unCheckedImage = {<Image source = {require('../../public/Iamge/Check/choose.png')} style = {styles.image}/>}
/>
 <CheckBox
 style={styles.checkBox}
 // onClick={()=>{
 //     this.setState({
 //     isTwoChecked:!this.state.isTwoChecked
 //     })
 // }}
 onClick={()=>this.chooseValue('TwoChecked')}
 isChecked={this.state.isTwoChecked}
 leftText={'女'}
 leftTextStyle = {styles.text}
checkedImage = {<Image source ={require('../../public/Iamge/Check/chooseChange.png')} style = {styles.image}/>}
unCheckedImage = {<Image source = {require('../../public/Iamge/Check/choose.png')} style = {styles.image}/>}
 />

//choose value
chooseValue = (value) =>{
   console.warn('3333333333------')
   console.warn('value------- ',value)
   if(value === 'OneChecked')
   {
        this.setState({
            isOneChecked:false,
            isTwoChecked:true,
        })
      console.log('OneChecked--------')
   }
   else if(value === 'TwoChecked')
   {
        this.setState({
            isOneChecked:true,
            isTwoChecked:false
        })
      console.log('TwoChecked--------')
   }
}
react-native-amap-geolocation (定位获取移动端信息)
获取 key Android key iOS key github 官方案例
npm i react-native-amap-geolocation  或者  yarn add react-native-amap-geolocation
react-native link react-native-amap-geolocation
react-native-amap3d (绘制地图)
git hub 官方 github demo 类似鹰眼的功能,动态绘制行动轨迹 简书
npm i react-native-amap3d
react-native link react-native-amap3d
地图状态包括: 中心坐标(coordinate) 缩放级别(zoomLevel) 倾斜度(titl) 旋转角度(rotation) 显示区域(region) 地图模式(mapType)
目前高德地图支持5种地图模式: 标准(standard) 卫星(satellite) 导航(navigation) 公交(bus) 夜间(night)
定位
          <MapView style={styles.mapBlock}
              mapType = "standard" //地图类型  standard: 标准地图  satellite: 卫星地图 navigation: 导航地图 night: 夜间地图  bus: 公交地图
              ref={(ref) => {this._mapView = ref}}
              locationStyle=
              locationEnabled={this.state.isStausChange} // 是否启用定位
              locationInterval={1} //定位间隔(ms),默认 2000
              distanceFilter={2} //定位的最小更新距离
              showsBuildings={true} //是否显示3D建筑
              showsZoomControls={false} //是否显示放大缩小按钮
              showsCompass={true} //是否显示指南针
              showsScale={false} //是否显示比例尺
              showsLabels={true} //是否显示文本标签
              scrollEnabled={true}//是否启用滑动手势,用于平移
              rotateEnabled={true} //是否启用旋转手势,用于调整方向
              tiltEnabled={true} //是否启用倾斜手势,用于改变视角
              coordinate={this.state.center} //中心坐标
              zoomLevel={18}//当前缩放级别,取值范围 [3, 20]
              zoomEnabled={true} //是否启用缩放手势,用于放大缩小
              // minZoomLevel = {18}//最大缩放级别
              // minZoomLevel ={5}//最小缩放级别
              />

    //动态绘制行动轨迹
    import React, {Component} from 'react'
	import {StyleSheet, Alert, View} from 'react-native'
	import Theme from '../common/Theme'
	import NavigationBar from "../components/NavigationBar";
	import {MapView} from 'react-native-amap3d'

	export default class PolylineExample extends Component {

	    constructor(props){
	        super(props);
	        this.polyline = [];
	        this.state= {
	            center:{
	                latitude:0,
	                longitude:0
	            },
	            line : [
	                {
	                    latitude:0,
	                    longitude:0
	                }
	            ]
	        }
	    }

	    getCenter(lat, long) {
	        this.setState({
	            center:{
	                latitude: lat,
	                longitude: long,
	            }
	        })
	    }

	    userAnimate(lat, long){
	        let coordinate = {
	            latitude: lat,
	            longitude: long
	        }
	        console.log("用户当前的坐标", coordinate)
	        this._mapView.animateTo({
	            coordinate : coordinate
	        })
	        this.polyline.push(coordinate)
	        this.setState({
	            line:this.polyline
	        })
	    }

	    render() {
	        return (
	            <View style={Theme.flex}>
	            <NavigationBar
	                title={"线上马拉松"}
	            />
	                <MapView style={styles.mapBlock}
	                    ref={(ref) => {this._mapView = ref}}
	                    locationEnabled={true}
	                    locationInterval={3500}
	                    distanceFilter={10}
	                    showsBuildings={false}
	                    showsScale={false}
	                    tiltEnabled={false}
	                    coordinate={this.state.center}
	                    zoomLevel={18}
	                    onLocation={({ nativeEvent }) => {
	                        // console.log("经度纬度",`${nativeEvent.latitude}, ${nativeEvent.longitude}`)
	                        this.getCenter(nativeEvent.latitude, nativeEvent.longitude)
	                        this.userAnimate(nativeEvent.latitude, nativeEvent.longitude)
	                    }}
	                >
	                    <MapView.Polyline
	                        key={Math.random()}
	                        ref={ref=>{this._polyline = ref}}
	                        width={5}
	                        color="rgba(255, 0, 0, 0.5)"
	                        coordinates={this.state.line}
	                    />
	                </MapView>

	            </View>
	        )
	    }
	}

	let styles = StyleSheet.create({
	    mapBlock:{
	        height:Theme.size.width/375*375,
	        width:Theme.size.width,
	    }
	});
react-native-splash-screen ( 启动页 )
npm i react-native-splash-screen --save
react-native link react-native-splash-screen or rnpm link react-native-splash-screen