记录VUE 技巧
.sync 与 $emit
-
父级 <——– > 子级 同步 变量
父级
<template> <div> <custom-form :changevisible.sync="showsubmodel" /> <div> </template>showsubmodel是 父级页面 data 中的变量 类型可以是 boolean、string、number等父级
v-on:自定义事件名与 子级$emit(update: 事件名,参数)事件名 必须一致子级
methods: { demo(){ this.$emit('update:changevisible', false) } }demo是 子级页面 methods 中的方法 -
父级 <——– > 子级 同步 方法
父级
<template>
	<div>
       <custom-form @changevisible="changeParent" />
    <div>
</template>
methods: {
     changeParent(val){
     	console.log("子级传参数-----------  ",val);
     }
 }
父级
@ 自定义事件名与 子级$emit(事件名,参数)事件名 必须一致子级
methods: { demo(){ this.$emit('changevisible', false); } } -
子级 A <——– > 父级 <——– > 子级 B 同步
父级变量
##### 子级 A
    A args

    methods: {
        demo(){
        	this.$emit('update:bodylistSync', false)
        }
    }
##### 父级
   <template>
   	<div>
       	<a-args  :bodylistSync.sync="asnHeadBody" >
       	<b-args  :asnHeadBody="asnHeadBody" >
       </div>
   </template>
##### 子级 B
    B args

   export default {
   	props: {
   		//表体
           asnHeadBody: {
             type: Object,
             default() {
               return {}
             },
           }
   	},
   	//监听 asnHeadBody值变化
       watch: {
           asnHeadBody:{
             handler(newValue, oldValue) {
               console.log('asnHeadBody  newValue  ---------------   ',newValue)
               console.log('asnHeadBody  oldValue  ---------------   ',oldValue)
               this.asnHeadBody = Object.assign(newValue,oldValue); //合并新旧对象
             },
             deep: true
           }
       },
   }
vue子组件调用父组件的方法
父级 父级最外层必须是div
<template>

  <div>

    <child></child>

  </div>

</template>

<script>

  import child from '~/components/dam/child';

  export default {

    components: {

      child

    },

    methods: {

      fatherMethod() {

        console.log('测试');

      }

    }

  };

</script>
子级
<template>

  <div>

    <button @click="childMethod()">点击</button>

  </div>

</template>

<script>

  export default {

    methods: {

      childMethod() {

        this.$parent.fatherMethod();

      }

    }

  };

</script>
ref 绑定 form
<template>
	<a-form-model class="custromform" :model="models" ref="ruleForm">
		<a-form-model-item
        	:label="ktem.label"
      		:name="ktem.value"
			v-for="(ktem, kindex) in columnData"
      		:key="kindex"
		>
			<a-input
                v-if="ktem.type == 'input' && ktem.field == 'ruleName'"
                placeholder="请输入"
                :style="{ width: wid * 0.6 + 'px' }"
                @change="changeNumber"
                v-model="models[`${ktem.field}`]"
             />
             // models.input  因为是动态rander 所有是 models[`${ktem.field}`]
         </a-form-model-item>
          <a-form-model-item :wrapper-col="{ span: 12, offset: 5 }">
              <a-button type="primary" @click="handleSubmit"> Submit </a-button>
          </a-form-model-item>
    </a-form-model>
</template>


data(){
	return{
		models:{}
	}
}

methods: {
	// 获取 表单值
    getFormValue() {
    	this.$refs.ruleForm.validate( async (valid) => {
        	console.log('getFormValue valid-----------   ', valid)

        }
    },
    // 重置表单一般在第一次访问表单时进行重置
    resetFormValue() {
	 	this.$nextTick(() => {
        	this.$refs.ruleForm.resetFields()
        	this.setFormValue(this.columnData)
        })
    },
    // 为表单设置默认值,常用于编辑的时候回显数据
    setFormValue(formData) {
      console.log('setFormValue formData ----------   ', formData)
          this.$nextTick(() => {
          	this.$set(this.models, item.field, item.valisNull)
          }
      }
        // console.log('setFormValue  models ------------', this.models)
    })
    //提交
    async handleSubmit(){
        await this.getFormValue();
        await this.resetFormValue();
    }
}
报错
关于vue 的 this.$refs 打印为undefined解决办法
关于 ref 注册时间的重要说明:因为 ref 本身是作为渲染结果被创建的,在初始渲染的时候你不能访问它们 - 它们还不存在!$refs 也不是响应式的,因此你不应该试图用它在模板中做数据绑定。
也就是说 ref 只有等页面加载完成好之后你才能调用 this.$refs ,如果你使用v-if 、v-for渲染页面的话,那么在刚开始页面没没渲染之前你是拿不到this.$refs 的,所以要等到页面渲染之后拿才可以
解决办法:
1、如果你在mounted里获取this.$refs,因为dom还未完全加载,所以你是拿不到的, update阶段则是完成了数据更新到 DOM 的阶段(对加载回来的数据进行处理),此时,就可以使用this.$refs了
2、如果写在method中,那么可以使用 this.$nextTick(() => {}) 等页面渲染好再调用,这样就可以了
3、或者加个定时器延时加载this.$refs(这个方法还没有试)
合并 Object 与 Object
函数 Object.assign( Object1 , Object2)
案例
var target ={ anotherName: "请选择",
closeClearColumn: "请选择",
closeInvokingMethod: "请选择",
createDefalutValue: "请选择"}
var source = {
closeClearColumn: "张三",
closeInvokingMethod: "李四",
followValueType: "",
tableIsShow: true,
tableOrder: "1",
tableWidth: "0",
}

var arr = Object.assign(target, source);
console.log(arr)

结果:
anotherName: "请选择"
closeClearColumn: "张三"
closeInvokingMethod: "李四"
createDefalutValue: "请选择"
followValueType: ""
tableIsShow: true
tableOrder: "1"
tableWidth: "0"
获取对象属性个数
函数 Object.getOwnPropertyNames( Object1 ).length
案例
var source = {
closeClearColumn: "张三",
closeInvokingMethod: "李四",
followValueType: "",
tableIsShow: true,
tableOrder: "1",
tableWidth: "0",
}

console.log(Object.getOwnPropertyNames(source).length)

结果:
6
引用封装数据变量 被更改 深拷贝浅拷贝
var testdata = JSON.parse(JSON.stringify( 封装数据变量 ));
js 字符串
1.去除字符串中 下划线以后的内容
var s = "sdsd_dd";

s = s.replace(/\_.*$/,'');

// 结果  s = sdsd
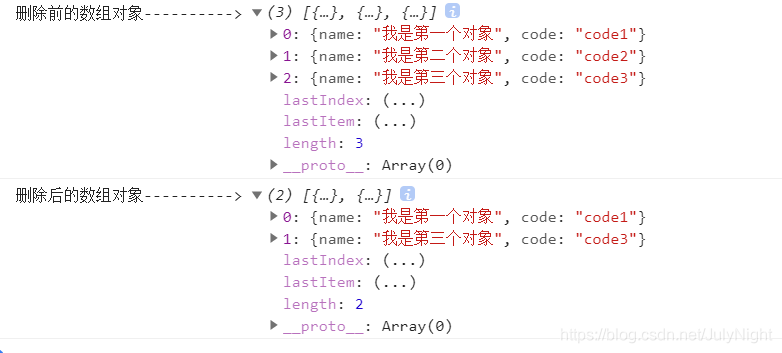
JS删除数组对象中指定元素对应的对象
/**
   * 删除
   */
  const onDelete = () => {
    const testArr = [
      { name: '我是第一个对象', code: 'code1' },
      { name: '我是第二个对象', code: 'code2' },
      { name: '我是第三个对象', code: 'code3' },
    ];
    const deleteAfterArr = testArr.filter(item => item.code !== 'code2');
    console.log('删除后的数组对象---------->', deleteAfterArr);
  };
获取对象中的key值
var jsonData={"key1":"value1","key2":"value2","key3":"value3"};
var result = Object.keys(jsonData);
console.log(result);
// ["key1", "key2", "key3"]
获取object中某key的值
var obj={"name":"tom","age":22,"job":"it"};
var keys="name";
console.log(obj[keys]);   //tom
console.log(eval("obj."+keys));   //tom
修改对象中的key值
原数据:

var array = [
    {
        id:1,
        name:"小明"
    },
    {
        id:2,
        name:"小红"
    }
];


改为的数据:

var array = [
    {
        value:1,
        label:"小明"
    },
    {
        value:2,
        label:"小红"
    }
];


var result = array.map(o=>{return{value:o.id, label:o.name}});
console.log(result);
JS中判断null、undefined与NaN的方法
1.判断undefined:
1 var tmp = undefined;
2 if (typeof(tmp) == "undefined"){
3 alert("undefined");
4 }
2.判断null:
var tmp = null;
if (!tmp && typeof(tmp)!="undefined" && tmp!=0){
alert("null");
}
3.判断NaN:
var tmp = 0/0;
if(isNaN(tmp)){
alert("NaN");
}
4.判断undefined和null:
var tmp = undefined;
if (tmp== undefined)
{
alert("null or undefined");
}

var tmp = undefined;
if (tmp== null)
{
alert("null or undefined");
}
说明:null==undefined
5.判断undefined、null与NaN:
var tmp = null;
if (!tmp)
{
alert("null or undefined or NaN");
}
6.判断对象是否为空对象
var data = {};
var b = (JSON.stringify(data) == "{}");
alert(b);//true

//使用ES6的Object.keys()方法
var data = {};
var arr = Object.keys(data);
alert(arr.length == 0);//true

JSON.stringify(obj) === '{}';
7.判断是否为空对象
JSON.stringify(obj) === '[]'
数组API
push
添加元素:返回length,并把参数添加到数组中。
var arr = [0, 1, 2]

pop
删除元素: 删除最后一位元素,删除的元素可以接受作为变量值。

unshift
在头部插入元素

shift
在头部删除第一个元素

concat
连接数组成为一个新数组,参数可以是其他数组的名称,也可以是数组。

splice
删除并插入元素:

slice
截取元素生成新数组 通过下标获取某段数据

reverse
倒着排序

sort
排序。默认0-9, a-z。也可以自己自定义规则。https://developer.mozilla.org/zh-CN/docs/Web/JavaScript/Reference/Global_Objects/Array/sort

indexOf
获取第一个索引

lastIndexOf
倒着往前查找

forEach
每个元素定义回调,每个元素都会执行。
var arr = ['apple', 'banana', 'pear', 'orange'];
arr.forEach(fn);
function fn(value, index, arr) {
     console.log(`value: ${value} - index: ${index} - arr: ${arr}`)
}

every()
方法测试一个数组内的所有元素是否都能通过某个指定函数的测试。它返回一个布尔值。
注意:若收到一个空数组,此方法在一切情况下都会返回true。
var arr = [10, 12, 27, 2];
var arr1 = [6, 20, 11, 8];

function greater(ar) {
    return ar >= 5;
}

some()
方法测试数组中是不是有元素通过了被提供的函数测试。它返回的是一个Boolean类型的值。如果用一个空数组进行测试,在任何情况下它返回的都是false。
var arr = [10, 12, 27, 2];
var arr1 = [6, 20, 11, 8];

function greater(ar) {
    return ar >= 25;
}

map()
方法创建一个新数组,其结果是该数组中的每个元素都调用一个提供的函数后返回的结果。
var arr = [10, 12, 27, 2];

function fn(x) {
     return x + 1;
}

filter
返回结果为true的数组
var arr = [10, 12, 27, 2, 4, 7, 13];

function fn(x) {
    return x < 10;
 }

reduce()
方法对数组中的每个元素执行一个由您提供的reducer函数(升序执行),将其结果汇总为单个返回值。
函数第一个参数是累积器,
var arr = [1, 2, 3, 4];

function fn(a, b) {
    return a + b;
}

reduceRight()
反向汇总
var arr = [1, 2, 3, 4];
function fn(a, b) {
    console.log(a, b)
    return a + b;
}

获取一个div的高度
无内联样式
<div ref="datailForm" > </div>

//宽度
this.$refs.datailForm.$el.clientWidth;

//高度
this.$refs.datailForm.$el.clientHeight;
Vue.js实现大屏数字滚动翻转效果

<template>
 <div class="chartNum">
    <h3 class="orderTitle">订单总量</h3>
    <div class="box-item">
     <li :class="{'number-item': !isNaN(item), 'mark-item': isNaN(item) }"
      v-for="(item,index) in orderNum"
      :key="index">
       <span v-if="!isNaN(item)">
        <i ref="numberItem">0123456789</i>
       </span>
      <span class="comma" v-else></span>
     </li>
    </div>
   </div>
</template>
<script>
 export default {
  data() {
   return {
    orderNum: ['0', '0', ',', '0', '0', '0', ',', '0', '0', '0'], // 默认订单总数
   }
  }
  mounted: {
   this.toOrderNum(num) // 这里输入数字即可调用
  },
  methods: {
    // 设置文字滚动
   setNumberTransform () {
    const numberItems = this.$refs.numberItem // 拿到数字的ref,计算元素数量
    const numberArr = this.orderNum.filter(item => !isNaN(item))
    // 结合CSS 对数字字符进行滚动,显示订单数量
    for (let index = 0; index < numberItems.length; index++) {
    const elem = numberItems[index]
    elem.style.transform = `translate(-50%, -${numberArr[index] * 10}%)`
    }
   },
   // 处理总订单数字
   toOrderNum(num) {
    num = num.toString()
    // 把订单数变成字符串
    if (num.length < 8) {
    num = '0' + num // 如未满八位数,添加"0"补位
    this.toOrderNum(num) // 递归添加"0"补位
    } else if (num.length === 8) {
    // 订单数中加入逗号
    num = num.slice(0, 2) + ',' + num.slice(2, 5) + ',' + num.slice(5, 8)
    this.orderNum = num.split('') // 将其便变成数据,渲染至滚动数组
    } else {
    // 订单总量数字超过八位显示异常
    this.$message.warning('订单总量数字过大,显示异常,请联系客服')
    }
   },
  }
 }
</script>
<style scoped lang='scss'>
  /*订单总量滚动数字设置*/
 .box-item {
  position: relative;
  height: 100px;
  font-size: 54px;
  line-height: 41px;
  text-align: center;
  list-style: none;
  color: #2D7CFF;
  writing-mode: vertical-lr;
  text-orientation: upright;
  /*文字禁止编辑*/
  -moz-user-select: none; /*火狐*/
  -webkit-user-select: none; /*webkit浏览器*/
  -ms-user-select: none; /*IE10*/
  -khtml-user-select: none; /*早期浏览器*/
  user-select: none;
  /* overflow: hidden; */
 }
 /* 默认逗号设置 */
 .mark-item {
  width: 10px;
  height: 100px;
  margin-right: 5px;
  line-height: 10px;
  font-size: 48px;
  position: relative;
  & > span {
   position: absolute;
   width: 100%;
   bottom: 0;
   writing-mode: vertical-rl;
   text-orientation: upright;
  }
 }
 /*滚动数字设置*/
 .number-item {
  width: 41px;
  height: 75px;
  background: #ccc;
  list-style: none;
  margin-right: 5px;
  background:rgba(250,250,250,1);
  border-radius:4px;
  border:1px solid rgba(221,221,221,1);
  & > span {
   position: relative;
   display: inline-block;
   margin-right: 10px;
   width: 100%;
   height: 100%;
   writing-mode: vertical-rl;
   text-orientation: upright;
   overflow: hidden;
   & > i {
    font-style: normal;
    position: absolute;
    top: 11px;
    left: 50%;
    transform: translate(-50%,0);
    transition: transform 1s ease-in-out;
    letter-spacing: 10px;
   }
  }
 }
 .number-item:last-child {
  margin-right: 0;
 }
</style>
vue 路由跳转四种方式 (带参数)
1. router-link
1. 不带参数
 <router-link :to="{name:'home'}">
 <router-link :to="{path:'/home'}"> //name,path都行, 建议用name
// 注意:router-link中链接如果是'/'开始就是从根路由开始,如果开始不带'/',则从当前路由开始。
 2.带参数
 <router-link :to="{name:'home', params: {id:1}}">
// params传参数 (类似post)
// 路由配置 path: "/home/:id" 或者 path: "/home:id"
// 不配置path ,第一次可请求,刷新页面id会消失
// 配置path,刷新页面id会保留
// html 取参 $route.params.id
// script 取参 this.$route.params.id
<router-link :to="{name:'home', query: {id:1}}">
// query传参数 (类似get,url后面会显示参数)
// 路由可不配置
// html 取参 $route.query.id
// script 取参 this.$route.query.id
2. this.$router.push() (函数里面调用)
1. 不带参数
 this.$router.push('/home')
this.$router.push({name:'home'})
this.$router.push({path:'/home'})
2. query传参
 this.$router.push({name:'home',query: {id:'1'}})
this.$router.push({path:'/home',query: {id:'1'}})
// html 取参 $route.query.id
// script 取参 this.$route.query.id
3. params传参
 this.$router.push({name:'home',params: {id:'1'}}) // 只能用 name

// 路由配置 path: "/home/:id" 或者 path: "/home:id" ,
// 不配置path ,第一次可请求,刷新页面id会消失
// 配置path,刷新页面id会保留
// html 取参 $route.params.id
// script 取参 this.$route.params.id
4. query和params区别
query类似 get, 跳转之后页面 url后面会拼接参数,类似?id=1, 非重要性的可以这样传, 密码之类还是用params刷新页面id还在
 params类似 post, 跳转之后页面 url后面不会拼接参数 , 但是刷新页面id 会消失
**3.this.$router.replace() (用法同上,push) **
4.this.$router.go(n) ()
this.$router.go(n)
向前或者向后跳转n个页面,n可为正整数或负整数
ps : 区别
this.$router.push
跳转到指定url路径,并想history栈中添加一个记录,点击后退会返回到上一个页面
this.$router.replace
跳转到指定url路径,但是history栈中不会有记录,点击返回会跳转到上上个页面 (就是直接替换了当前页面)
this.$router.go(n)
向前或者向后跳转n个页面,n可为正整数或负整数
监听键盘鼠标事件
1.增加监听
mounted () {
	window.addEventListener("click", this.clickOther); //鼠标
    window.addEventListener('keyup',this.handleKeyup);//键盘
    window.addEventListener('scroll',this.handleScroll);//滑轮
},
-
方法调用
methods:{ // 键盘事件 handleKeyup(event){ const e = event || window.event || arguments.callee.caller.arguments[0] if(!e) return const {key,keyCode} = e console.log(keyCode) console.log(key) }, // 滑轮事件 handleScroll(){ var e = document.body.scrollTop||document.documentElement.scrollTop if(!e) return console.log(e) }, } -
移除监控
destroyed () {
    window.removeEventListener('keyup',this.handleKeyup)
    window.removeEventListener('scroll',this.handleScroll)
    window.removeEventListener('click', this.clickOther);
},